I won't lie. I love potatoes. I like them mashed, fried, baked, broiled, baked...pretty much anyway. These carb-laden devils are one of my weaknesses (though, I have many). Sometimes I think that if this country were heading into a depression I might be perfectly satisfied with just eating potatoes and cereal. This post actually has 2 recipes. One for chicken and one for potatoes. And while the chicken dish was definitely very good, it pretty much involved no effort on my part. Most of my time was spent working on the potatoes. A lot of work for a side dish, but the end result was definitely worth it.
Ricotta Stuffed Chicken
(recipe adapted from Once Upon a Plate)
2-3 large chicken breasts with skin and bones

8 oz ricotta cheese
2-3 Tbs dried parsley
Twice-Baked Potatoes
(my own recipe)
3-4 large baked potatoes
1 1/2 cups plain yogurt
1 package pancetta
2 cups grated sharp chedder cheese
First things first, the potatoes are going to take about 45-60 min to cook so wash them, wrap them in foil, and place them in the oven at 400°. If you have someone at home who can get them in ahead of time, do it. If not, just sit and relax for about 30 minutes.
Cook the pancetta in a pan at med-hi heat. Pancetta is similar to bacon, but it cooks a lot cleaner (less oil) and has a unique flavor to it. It's a little difficult to tell when it's done, so just realize that it'll cook slightly faster than bacon. Once cooked, set aside for later.
In a bowl mix the ricotta cheese and parsley. Wash chicken and pat dry with a paper towel. Stick finger under the skin to slightly loosen it from the meat. Try to keep the skin attached to the muscle along the edges of the chicken breast. Take a spoon and start scooping the ricotta mixture between the chicken breast and skin. You can get the mixture to the end of the chicken breast by massaging it downward from the outside (kind of like the what you would do to get the toothpaste to the end of the tube). Once you get a fairly even generous layer of cheese in there, brush the outside of the chicken breast with oil and season with salt and pepper. Place in a pan bone side down and bake uncovered at 350° for about 25-30 min until juices run clear and the top of the chicken is slightly browned. At this point, I lowered the temp of my stove and continued baking the potatoes while the chicken cooked. (Note: raw chicken looks awful in photographs, so I don't have any pictures of the process.)
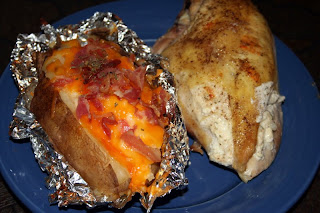
Crumble the pancetta. In a bowl mix yogurt, 1 cup of the grated shredded cheese, and 1-2 handfuls of the pancetta. Take the potatoes out of the oven and check them. I unwrapped the potatoes and, at first, cut a slit in them to check them. Later I found out this was a waste. Just unwrap them and cut them straight in half. Poke with a fork to see if the innards are soft. If not, fold back together with the tin foil and put back in the oven until they are done. Once done, let cool for about 5-10 minutes (enough to be able to handle them). Take a fork and start scra ping out the inside of the potato leaving the skin as in tack as possible (I wasn't very good at this). Put all the scraped potato into the bowl and mix thoroughly into the mixture. I try to mash any big chunks, but you don't have to get it perfect. Scoop the mixture back into the potato shells. Be generous. Top with the remaining cheese and pancetta and throw back into the oven for 10-15 minutes. I kept my potatoes in the foil, but folded down the sides for this stage. This helps keep the potato sides together, but also acts to prevent any melting cheese from getting on your oven racks.
 ping out the inside of the potato leaving the skin as in tack as possible (I wasn't very good at this). Put all the scraped potato into the bowl and mix thoroughly into the mixture. I try to mash any big chunks, but you don't have to get it perfect. Scoop the mixture back into the potato shells. Be generous. Top with the remaining cheese and pancetta and throw back into the oven for 10-15 minutes. I kept my potatoes in the foil, but folded down the sides for this stage. This helps keep the potato sides together, but also acts to prevent any melting cheese from getting on your oven racks.
Take out the chicken and potatoes and serve as is. Yuuuummmmy!
A couple notes on this recipe: 1) Most people use sour cream for the twice-baked potatoes. I only had yogurt on hand and honestly...it was great. I don't see any reason to add the extra calories of sour cream. 2) I had leftovers the next day for lunch. I honestly think the potato was even better reheated than it was the day before (but that could have been the fact that I was at work and never have anything really great for lunch at work).
Validation of Goodness: I got the chicken breasts at the Reading Terminal Market and they were HUGE! I only ate half of mine and saved the other half for the next day. I gave Jon the larger one and at the end of the night he had eaten all of his and was picking at the rest of mine!

Validation of Goodness: I got the chicken breasts at the Reading Terminal Market and they were HUGE! I only ate half of mine and saved the other half for the next day. I gave Jon the larger one and at the end of the night he had eaten all of his and was picking at the rest of mine!
If you try this one (or any of my recipes) out let me know what you think!
I am officially caught up on posts, for now. We'll see what creations I decide to try next week.


